Boozy Root Beer Floatsicles

A root beer float + popsicle + booze! The Boozy Root Beer Floatsicle

When I was only about four feet tall, I thought there was nothing greater than a beautiful Summer day with Dad at the mini golf course. There was an ice cream stand right next door, so we always finished each match with fizzy root beer floats. As an adult, I couldn’t remember the last time I had enjoyed a root beer float, so during our family vacation this past Christmas, we all decided to make some floats during movie night. The warm waves of nostalgia washed over me as I sipped my root beer float, but then my thoughts inevitably turned to how I could make an adult variation come Summertime.

Well, Summer’s here, and so are my boozy root beer floatsicles! And let me tell you, they’re every bit as delicious as my beloved childhood treat. Check out how I made them below!

A root beer float + popsicle + booze! The Boozy Root Beer Floatsicle

A root beer float + popsicle + booze! The Boozy Root Beer Floatsicle

I played around with the proportions a bit to make sure the popsicles still freeze, despite the alcohol content. Each 3oz popsicle I made contains about as much alcohol as half a shot. You definitely don’t want to pour the alcohol any heavier than what I’ve laid out below, and cranking up your freezer wouldn’t hurt either.

A root beer float + popsicle + booze! The Boozy Root Beer Floatsicle

  • 4oz* of root beer
  • 4oz* of vanilla vodka, divided (or add 1t of sugar and 1t vanilla extract to regular vodka)
  • 2oz* of half & half
  • 2oz* heavy whipping cream
  • 1t sugar
  • measuring cup
  • whisk
  • popsicle mold with sticks
*The measurements above make four 3oz popsicles. If your popsicle molds are a different size, just follow the proportions shown in the image below.
 

A root beer float + popsicle + booze! The Boozy Root Beer Floatsicle

A root beer float + popsicle + booze! The Boozy Root Beer Floatsicle

Step One: Measure out the cream portion of the popsicle. Your proportions of vodka, half & half, and whipping cream should be equal.

Step Two: Combine above ingredients into a large measuring cup, add 1 teaspoon of sugar, and whisk until ingredients are combined. The mixture will not fluff like whipping cream, so don’t worry about whisking too hard!

Step Three: Pour the cream mixture into the popsicle molds.They should be about halfway full.

A root beer float + popsicle + booze! The Boozy Root Beer Floatsicle

Step Four: Measure out the soda portion of the popsicle. The ratio should be 1:2 for the vodka:root beer.

Step Five: Combine the root beer and vodka in the measuring cup and fill half of the remaining space in the molds with the mixture.

A root beer float + popsicle + booze! The Boozy Root Beer Floatsicle

Step Six: Freeze the popsicles for a couple of hours, then insert sticks (if you don’t have lids with sticks for your mold). Top the semi-frozen pops with the remaining soda mixture. Splash in some more root beer from the bottle if you need more liquid. Freeze until the popsicles are completely solid.

Step Seven: Dip the frozen mold into a bowl of warm water to loosen the popsicles. Gently wiggle the popsicles by their sticks to remove them from the mold. Be careful— the alcohol content will make the popsicles more fragile than usual, so handle with care! I laid my popsicles on plates and put them back in the freezer for a bit before serving.

A root beer float + popsicle + booze! The Boozy Root Beer Floatsicle

A root beer float + popsicle + booze! The Boozy Root Beer Floatsicle

My friends stopped over for a visit just as I was pulling my boozy popsicles out of the freezer. Great timing, eh? (You probably figured out that’s not my hand in the photo above!) The three of us gave these root beer floatsicles 6 thumbs up! Just make sure you have some napkins standing by as you enjoy your frozen treat.

A root beer float + popsicle + booze! The Boozy Root Beer Floatsicle

Sew Your Own Custom Back-Wrap Top

Make your own sewing pattern for a custom wrap top. Step by step photos of sewing process included!

Ready to get your sew on? If you liked the back-wrap top I shared last week, then check it— I’m back with detailed instructions! I hope you won’t be too intimidated to give it a go. If you’re worried about making darts, you can start out with a knit fabric instead of something woven. And you don’t have to make it reversible, but then it would only be half the fun. Point is: You make the rules! If you do make your own, though, just do me one little favor. Link it up, babies!

Make your own sewing pattern for a custom wrap top. Step by step photos of sewing process included!

Make your own sewing pattern for a custom wrap top. Step by step photos of sewing process included!

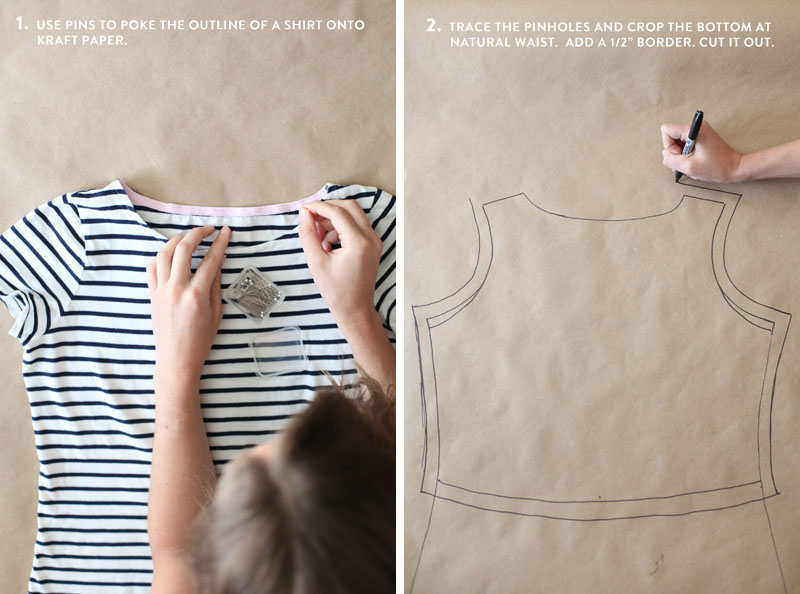
Step One: Find a shirt that fits closely (but doesn’t stretch) to your figure. Transfer its shape to a piece of kraft paper by poking holes along its border with straight pins. You may also chose to trace the shirt with a fabric pen.

Step Two: Trace the pinhole outline with a pen, cropping the shirt at its natural waist. It’s better to crop it longer than you may eventually want it and you can trim it down later. Add a 1/2″ border to the outline for hem allowance. Then Cut out the piece of paper.
Make your own sewing pattern for a custom wrap top. Step by step photos of sewing process included!

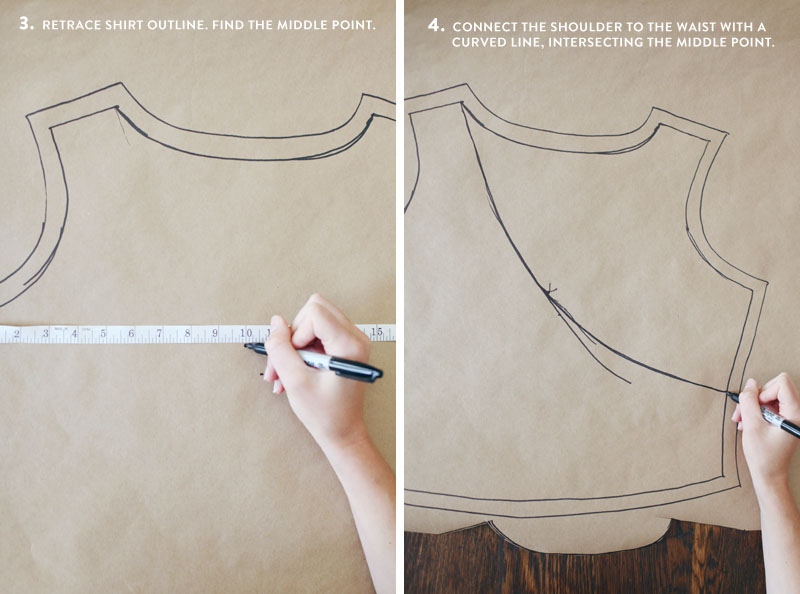
Step Three: Trace the pattern from step two, and indent the outline of the 1/2″ hem allowance. Find the middle of the piece between the armpits.

Step Four: Draw a curved line from the inside, top of the shoulders to the waist, just about 3-4″ from the bottom. Make sure the line you draw intersects the middle point you marked in step three. Cut out the paper along the curve, flip the paper up-side-down and trace it to create the other side of the back.

Make your own sewing pattern for a custom wrap top. Step by step photos of sewing process included!

Step Five: I got a little creative with the neckline by making a ’50s style v-shape. I also created extension pieces for each of the back wrap pieces, each measuring 19″ in length. I decided on their length by having a friend hold ribbon pieces at my waist, tying them comfortably at the front of my waist, and trimming the excess ribbon. Each piece measured 19″ long.

Make your own sewing pattern for a custom wrap top. Step by step photos of sewing process included!

Step Six: Pin the pattern pieces onto your both layers of coordinating fabric and cut out each piece. Make sure as you stack the coordinating fabric that the right sides are facing each other or away from each other. I laid out my pattern pieces on the bias (diagonally) so the fabric would stretch a bit against my curves. I was able to get the back wrap pieces and their extensions all in one piece, instead of cutting out the extensions separately and connecting them.

Make your own sewing pattern for a custom wrap top. Step by step photos of sewing process included!

Step Seven: Begin the process of making bust darts by finding the middle part of the front piece. Then measure out 4″ from the middle point on each side. This is the measurement I used to make my darts after holding the fabric to my body and judging where they should go.

Make your own sewing pattern for a custom wrap top. Step by step photos of sewing process included!

Step Eight: Measure 1.25″ out from the points you just marked in step seven. This will be the width of your darts.

Step Nine: Place a dot in between the two dots from step eight, then measure up 5″. Connect the dots to create the lines for the darts.

Make your own sewing pattern for a custom wrap top. Step by step photos of sewing process included!

Step Ten: Create darts using a similar technique on the sides of the front piece. Again, I measured my darts according to my own body, but if you are similar to me, you may want to measure 5″ down from the armpit hole for the top line of the dart. Then go down 1.25″ for the bottom line of the dart. The point of the dart was positioned 1″ above the point of the bottom darts, as shown in the above image. Connect the top, middle, and bottom lines of the dart to the point.

Make your own sewing pattern for a custom wrap top. Step by step photos of sewing process included!

Step Eleven: Iron the darts so that the crease is right at the middle line of each dart. Then stitch along the outside lines of the darts. Then Iron them flat.

Make your own sewing pattern for a custom wrap top. Step by step photos of sewing process included!

Step Twelve: Begin assembling the top by placing the back wrap pieces face-to-face onto the front piece. Pin along the shoulders and sides and stitch together, 1/2″ from the edge. Then iron the hems flat to prevent bulk when assembling the entire pieces in the next step. You may be able to see that I also sewed darts into the back wrap pieces for an extra fitted design, but it’s really not necessary due to the wrap style.

When you are finished connecting the pieces, make sure it fits you properly. If it doesn’t, you’ll need to make the proper adjustments before continuing.

Make your own sewing pattern for a custom wrap top. Step by step photos of sewing process included!

Step Thirteen: After you’ve completed steps 1-12 with a coordinating fabric (make sure the patterns don’t show through each fabric), fit the pieces together carefully, face-to-face. At this point you are checking to make sure the armpits and shoulders match up. This is why you need to cut both fabrics at the same time and stitch precisely 1/2″ from the edge of the fabric. If they don’t match up at this point, you will need to rip out the hem and correct the fit of one of the pieces.

Pin together the pieces along the neckline, reaching all the way to the ends of the wrap extension pieces. Then stitch 1/2″ from the edge.

Make your own sewing pattern for a custom wrap top. Step by step photos of sewing process included!

Step Fourteen: Cut little slits along the neckline and other curved areas where you have stitched. This will prevent puckering after you flip the piece right-side out.

Make your own sewing pattern for a custom wrap top. Step by step photos of sewing process included!

Step Fifteen: Now pin along the bottom edge of the two pieces and stitch them together everywhere except along the front. This open part is where you will flip the piece right-side-out in the next step.

Make your own sewing pattern for a custom wrap top. Step by step photos of sewing process included!

Step Sixteen: Now you can flip the top right-side-out through that opening you left in the previous step. Use a capped pen to help you with the pointy ends of the wrap extension pieces. Now iron along the hems to flatten it out. Flip under the open section of the front and iron along with the rest of the bottom hem.

Make your own sewing pattern for a custom wrap top. Step by step photos of sewing process included!

Step Seventeen: Pin along the opening of the front, where you just ironed, and then stitch it closed, very closely to the edge of both layers of fabric.

Make your own sewing pattern for a custom wrap top. Step by step photos of sewing process included!

Step Eighteen: Cut little slits long the armholes to prevent puckering after finishing them.

Make your own sewing pattern for a custom wrap top. Step by step photos of sewing process included!

Step Nineteen: Fold under the fabric along the armholes, ironing as you go along. Work one fabric side at a time.

Step Twenty: After each fabric side has been folding under at the armpit holes, each fabric side’s edge matching up, pin the two faces together and then stitch very closely along the edge.

I hope to get a lot of wear out of this top through the Summer— with high waisted shorts, skirt, and even over top of dresses. Yep, it’s a suitor!

INSPIRED BY: Late Fifties’ Homes

Late Fifties' Homes on Making Nice in the Midwest

As our 1959 ranch has begun to take shape in its second year as our home sweet home, I’ve been drawing loads of inspiration from vintage interiors from the same era. The color scheme, the restrained and smart furniture arrangements, and especially the sparse and avant-garde placement of wall art. Check out my most recent round-up of vintage home inspiration, and be sure to check out my INSPIRED BY: Vintage Homes archives!

Late Fifties' Homes on Making Nice in the Midwest

Everything about these interiors is pretty drool-worthy, if you ask me, but mostly I really love the modern furniture covered in fun colors and patterns. No safe, tan sofas in these homes! And check it out— a pink shag rug? And it somehow doesn’t look tacky. Those are the decorating chances I’d love to take if Phil would let me. It all works with tasteful style and restrained backgrounds. Someone get this women a pink shag rug, will ya? Or better yet— a pink passion pit right smack dab in the middle of my living room! Oh yeah.

Late Fifties' Homes on Making Nice in the MidwestLate Fifties' Homes on Making Nice in the Midwest

vintage magazine images found at these Pinterest links: 1 2 3 4 5 6

 Older