Mint Chocolate Chip Marshmallows

Mint ChMint Chocolate Chip Marshmallows Recipe with International Delight hot chocolateocolate Chip Marshmallows Recipe

Not that there’s a law against enjoying mint chocolate chip ice cream in the winter, but why would you when you can enjoy decadent hot chocolate topped with these fluffy mint chocolate chip marshmallows? Seriously— I’ve found my new addiction! I whipped up two batches of these guys over the weekend, and I’m bound to make more before the holiday season is over. We enjoyed our mint chocolate chip marshmallows in mugs of International Delight hot chocolate— dark chocolate for me and Phil, and milk chocolate for Lucy. Sooo creamy and rich! The perfect treat to enjoy while watching holiday movies beside the Christmas tree.

Be sure to check out International Delight’s website for a chance to win a $5,000 holiday brunch for your friends and family hosted by International Delight!

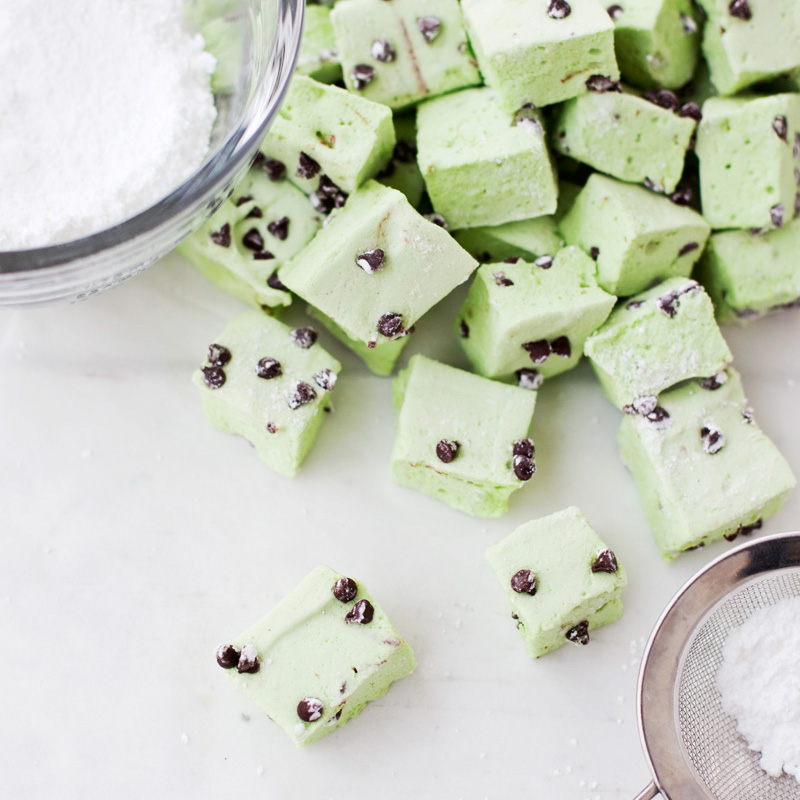
Mint Chocolate Chip Marshmallows Recipe

Mint Chocolate Chip Marshmallows
Delicious on their own, and even better in hot chocolate! Make some to keep at home, and make extra to give as holiday gifts.
Write a review
Print
Cook Time
15 min
Cook Time
15 min
3939 calories
852 g
29 g
39 g
82 g
23 g
1398 g
550 g
597 g
0 g
11 g
Nutrition Facts
Serving Size
1398g
Amount Per Serving
Calories 3939
Calories from Fat 339
% Daily Value *
Total Fat 39g
59%
Saturated Fat 23g
117%
Trans Fat 0g
Polyunsaturated Fat 2g
Monounsaturated Fat 9g
Cholesterol 29mg
10%
Sodium 550mg
23%
Total Carbohydrates 852g
284%
Dietary Fiber 5g
18%
Sugars 597g
Protein 82g
Vitamin A
5%
Vitamin C
0%
Calcium
35%
Iron
24%
* Percent Daily Values are based on a 2,000 calorie diet. Your Daily Values may be higher or lower depending on your calorie needs.
For the gelatin bloom
  1. 3 packs gelatin powder
  2. 1/2 Cup cold water
  3. 1 teaspoon vanilla extract
  4. 1 teaspoon peppermint extract
For the syrup
  1. 3/4 Cup water
  2. 1 1/4 Cup corn syrup
  3. 1 1/2 Cup sugar
Add ins
  1. 3/4 Cup mini chocolate chips (reserve 1/4 Cup for pan)
  2. Food coloring (optional)
For coating the pan and marshmallows
  1. Cooking spray
  2. 1/4 Cup cornstarch
  3. 1 Cup powdered sugar
Prep
  1. Spray a 9x13 pan or jelly roll pan with cooking spray, then sprinkle with cornstarch and tap it around to coat the entire pan.
Bloom the gelatin
  1. Mix the gelatin ingredients to an apple sauce consistency in the bowl of your stand mixer.
Cook the syrup
  1. Mix the syrup ingredients in a sauce pan over medium heat and bring to a rolling boil. Do not stir once the mixture begins to boil. Once the mixture reaches 250 degrees, remove from heat.
Whip the ingredients together
  1. Slowly pour the hot syrup into the gelatin with the stand mixer on a slow speed. Cover with a clean towel (to avoid hot splattering) and increase the speed to high. Whip for ten minutes until the mixture is fluffy. Around five minutes, begin to add food coloring to achieve the color you desire.
  2. Sprinkle about 1/8 cup of mini chocolate chips onto the bottom of your baking pan. Fold 1/2 cup of the chips into the marshmallow mixture, making sure not to stir too much or the chocolate will melt. Quickly pour the mixture into the baking pan and spread it around evenly. Top with the remaining 1/8 cup of mini chips.
Finishing
  1. Allow the marshmallows to cure for twelve hours, then sprinkle with powdered sugar. Turn out the block of marshmallows onto a powdered sugar coated work surface, and sprinkle with more powdered sugar. Cut into your desired shapes, toss to coat in powdered sugar, and store in an airtight container for up to three months.
Adapted from The Kitchn
beta
calories
3939
fat
39g
protein
82g
carbs
852g
more
Adapted from The Kitchn
Making Nice in the Midwest https://makingniceinthemidwest.com/
Mint Chocolate Chip Marshmallows Recipe

Mint Chocolate Chip Marshmallows Recipe

Mint Chocolate Chip Marshmallows Recipe

Mint Chocolate Chip Marshmallows Recipe

Mint Chocolate Chip Marshmallows Recipe

I was intimidated of making marshmallows for quite a while, and considering how inexpensive they are to purchase, I never saw a reason to make my own. But adding in my own flavoring was just the push I needed to get started, and I’m so glad I did, because they really are amazing!

Mint Chocolate Chip Marshmallows Recipe

Mint Chocolate Chip Marshmallows Recipe with International Delight hot chocolate

The marshmallows were perfect companions to our mugs of super creamy International Delight hot chocolate. They melt into the chocolate and add a special touch to a nostalgic holiday treat. This weekend we enjoyed mugs of the hot chocolate with breakfast (weekend rules!) and then later while watching the Charlie Brown Christmas movie. Warm fuzzies all over!

Mint Chocolate Chip Marshmallows Recipe

Mint Chocolate Chip Marshmallows Recipe

This is a sponsored conversation written by me on behalf of International Delight. The opinions and text are all mine.


The Dollhouse Bathroom

dollhouse project

Well, I didn’t quite get this dollhouse finished by Thanksgiving, as I’d hoped. Those who follow me on social media might know that my dad’s been in the hospital for the past week, and might be facing open heart surgery this Thursday. Still not sure what’s happening with him, but things got really scary last week, and so the dollhouse (and everything else in my life) was neglected while I hung out with my pops. Anyway, before that happened, I had finished the top floor of the dollhouse.

I decided to stick to a relatively limited color palette for the entire dollhouse: orange, yellow, and pink. Of course, accent colors and neutrals will be thrown in here and there, but I decided it should all look cohesive when viewed as a whole, rather than doing different colors in each room. Then each floor would also have a main color theme. The top floor is gold, the middle floor is pink, and the first floor and upstairs hallway is mostly neutral with pops of color here and there.

dollhouse bathroom

Here’s the bathroom with a lovely ’70s color scheme. It was just going to be a bright white space, but then I got carried away with details, as I usually do, resulting in the look you see above. I painted the bathroom fixtures (as shown later in this post), glued together accessories and painted them gold, used tiny scraps of fabric for towels, and a button and handcut mirror sheet for a vanity mirror. Everything is linked to at the end of this post.

Here’s what the room started out like:

IMG_7864

dollhouse bathroom

I sanded down the porcelain bathroom accessories with 320 grit sandpaper, and painted with several light coats of this citron spray paint. Then I finished with gold striping and then a few light coats of high gloss polyurethane.

dollhouse bathroom yellow

dollhouse bathroom

In between coats of paint on the bathroom fixtures, I painted the top part of the walls in the bathroom. Then I added tile sheets to the walls and floors and tiny wooden trim between the paint and tile on the wall.

dollhouse bathroom yellow

dollhouse bathroom

Here it is with everything inside. It’s difficult to get a photo after I added the roof edges to this side of the dollhouse, since the roof edge kind of blocks the view of the camera with a straight-on shot. I still need to add some kind of rug, and haven’t decided if I’ll add window treatments to this room. Not that the dolls are exhibitionists, but I’m just pretty proud of how my dormers turned out, and don’t know if I want to hide all the hard work I did carefully cutting the holes for the dormers and filling and sanding it perfectly smooth. When things go wrong in my life, I want to be able to walk over and check out the dollhouse dormers and feel good about something! Haha! (Only partially kidding.)

So what do you think about rug options? I’m thinking maybe a circular white fluffy rug? Originally I was going to do something like jute, but this room is a little too fancy pants for that kind of rug now, in my opinion.

dollhouse bathroom

dollhouse nursery

While we’re looking at the bathroom on the third floor, I thought I might as well show you the other side— the nursery! This room is pretty sparsely decorated as of now. It’s difficult to arrange furniture in here because of the 45 degree angle of the outside wall. I also don’t have much furniture for this space, since I moved other nursery items (dresser and high chair) into different rooms of the house. I also don’t know about window treatments in this room.

I still need to add the stairway details (railing, treads, carpet), so part of the nursery will still get a railing and finished baseboards. And speaking of details, I think I’m going to add a little pom pom garland and wall art in this room. Maybe a rocking chair with a side table and lamp too! We’ve got time to think about those things later, though. Now I’m just trying to finish up the rest of the house in time for Christmas. Thank God I started this project early!

dollhouse modern

S O U R C E S :

I’m really chomping at the bit to finish up this house, but I guess all good things come to those who wait! Right now we’ll just be spending a lot of time together as a family, and then at night when I have a spare hour or so, I’ll work on finishing up details here and there. But it’s so exciting to see it coming together!

Holiday Style with The Children’s Place

The Children's Place Winter 2015

When I was a little girl, I looked forward to Christmas dresses almost as much as I looked forward to Christmas presents. I remember wearing a fluffy faux fur white coat with a matching beret when I was four years old. Under the coat was a plaid dress with puffed sleeves and black velvet ribbons. I even remember my shoes! Black patent leather t-straps. Now I get to enjoy the fanciness of playing holiday dress-up with my own little girl, who luckily has a lot of fun with it too.

The Children’s Place asked us to select our favorites from their Holiday 2015 collection, and I was so delighted to find beautiful, classic pieces with some vintage style and also some quirky accessories for an added jolt of fun. I was able to do all of my shopping online from the comfort of my home when the kiddos were in bed, and Lucy had the time of her life opening up the big box of clothes and pulling out each new item. Here’s what we selected below:

The Children's Place Winter 2015

The Children's Place Winter 2015

1. white turtleneck and black dress
2. white peter pan collar dress with drop waist
3. panda blanket sleeper
4. purple critter tights
5. knit pink tights
6. patent black ballerina flats
7. faux fur pom pom headband
8. black jeggings
9. metallic gold t-strap shoes
10. leopard print faux fur coat

The Children's Place Winter 2015

You guys! This outfit (above) slayed me. She’s like a little sixties style icon. Wearing a black turtleneck and black jeans, we’ve got the beatnik look covered, and then the faux fur leopard fur coat tops it off with the perfect dose of vintage glamour. We paired her black ballet slippers with white socks just like Audrey Hepburn in Funny Face.

The Children's Place Winter 2015

The pom pom headband and gold shoes were a big hit with Lucy! She loved the little critter tights, too, but probably not as much as me.

The Children's Place Winter 2015

The Children's Place Winter 2015

See, like I said, style icon status!

The Children's Place Winter 2015

The Children's Place Winter 2015

I couldn’t resist getting some matching pajamas for the sisters. How cute are these panda bear sleepers? They’re perfect for cozy evenings of sipping hot chocolate by the tree while watching Christmas movies. Now if only they sold adult size sleepers… I’m sure Phil would be thrilled to get in on the matching action.

The Children's Place Winter 2015

Thanks to The Children’s Place for making our holiday season a little bit cuter! Now I’m off to snuggle my little panda bears.

Disclosure: This post is sponsored by The Children’s Place. All thoughts and opinions are my own and do not reflect the views of The Children’s Place.

 Older