DIY | Giftable Bread Loaf Wraps + FREE TEMPLATE
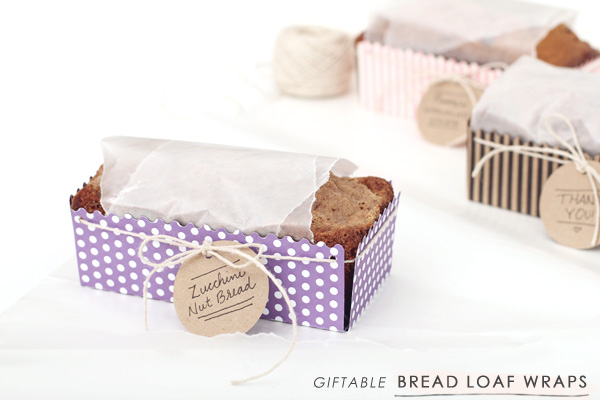
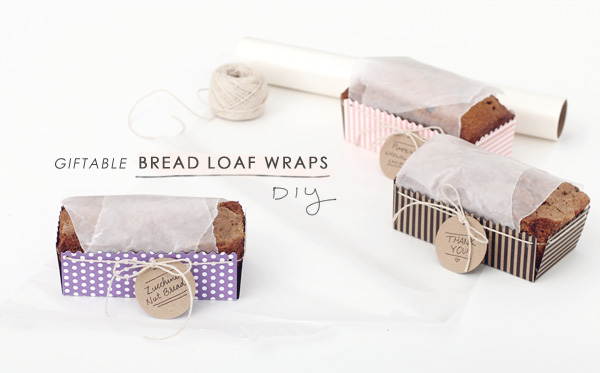
Have the nesting urges hit me yet? I’m not sure, but judging by the number of quick bread loaves piling up in my kitchen, the chances are pretty good that I am! After wrapping them all tightly with plastic wrap, and stowing them away in the freezer, I plan on gifting the loaves to friends and family who offer us help during my first month or so with the little kiddo. Now, I ask you, would you rather receive a bread loaf stuffed into a zip-lock bag? Or something delicious wrapped in a pretty, patterned package? I prefer the pretty option. And I hope my family and friends will appreciate their little gifts too!

Want to make your own mini loaf wraps? Check out the directions and printable template below.
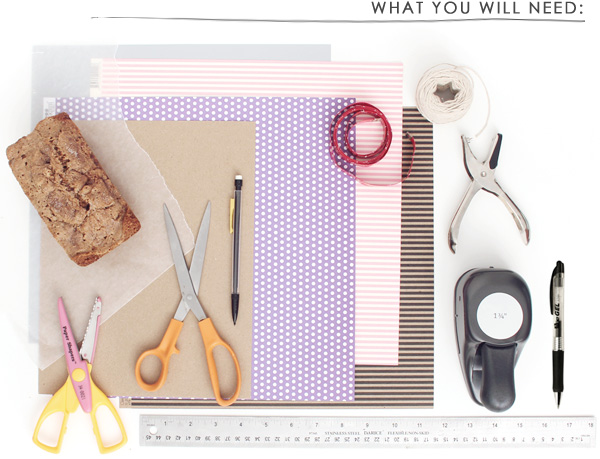
  • mini (or full sized, but you will have to make your own template) bread loaf
  • variety of heavy-weight patterned paper plus coordinating card stock
  • light-colored cardstock to use as a template
  • scissors (regular and decorative edged)
  • tiny hole punch
  • twine or ribbon
  • 1 1/4″ hole punch
  • measuring tape
  • ruler
  • pencil and gel pen

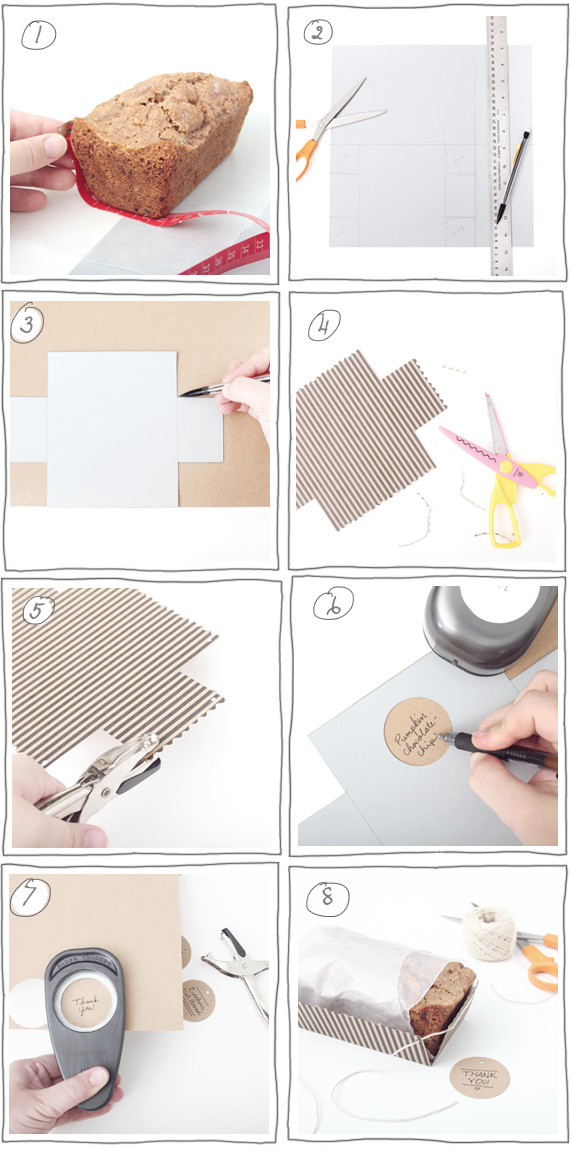
1.) Print the template onto your card stock, if you are working with a mini loaf. If you are working will a full-size loaf, measure the perimeter (just sides and bottom, not top) of the short and long sides of the loaf. Note the width on the template card stock, and then measure the height of the sides of the loaf, noting this dimension as well.

2.) Cut out your printed template, or if you are making your own, mark the perimeter onto your card stock (my mini loaf measured 6×8″), and then mark out squares in the corner, measured to the size of the height of the loaf (mine measured 1.75″). Connect the lines with your ruler and a pencil, then cut along the lines to make the template.

3.) Using a pencil, trace the template onto the back side of your patterned paper, making sure the pattern is going the direction you prefer. Then cut out the patterned paper.

4.) Trim the tops of each side with decorative edged scissors.

5.) Using the tiny hole punch, punch holes into the two corners of each edge. You will punch 8 holes total.

6.) Punch a hole into your template with the 1 1/4″ hole punch, to use as a template for writing your tag labels onto the coordinating card stock. Lay the template over your coordinating card stock, and using a black gel pen, and write your message in the middle. If your first line ends up off centered, just adjust the template. This is why you are writing the label before punching out the circle.

7.) Once your label is written, line up the back side of the hole punch with your label and punch it out, making sure you leave enough room at the top for punching a tiny hole to attach the label with twine.

8.) Bend the sides of your patterned paper wrap, insert the loaf (wrapped in plastic or wax paper first), and interlace the tiny punched holes with twine. Make sure you have enough twine left on the ends to tie a bow! Trim the twine, tie it, attach the label, and then tie it into a bow.
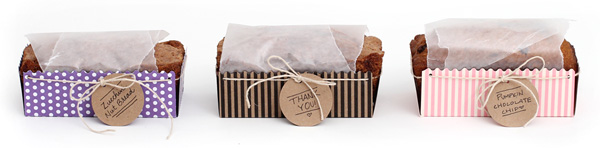
That’s all there is to it! I made a bunch of these little guys at once, to keep back and use in the future, because they’ll be great to give for the holidays, as party favors, or to prettify a bake sale. Easy as pie, right? Or I should say, easy as quick bread. Enjoy!
A Sweet Brunch with DIY Beaded Kabobs

It’s officially Summertime, and now that Phil can sleep in whenever he likes, I’m certainly not above bribing him with treating ourselves to a sweet breakfast as incentive to get ourselves out of bed on these hot days. I used the wooden bead skewer project to throw together a quick and simple breakfast that we could enjoy while sipping on cool drinks on our shaded patio.

I cut out the greens of the strawberries to give each piece of fruit a heart shape, and stacked them on the kabobs with glazed doughnut holes. For our drinks, I trimmed down the skewers and speared strawberries to garnish our juice glasses. I was really wishing I could make passion fruit mimosas… but alas. I’ll have to wait for baby to come first to enjoy a decadent breakfast like that! For now? Doughnuts and strawberries will definitely do just fine!

For the Sweet Tooth | Almond Joy Muddy Buddies

Almond-joy-puppy-chow

I have fond memories of teenage slumber parties at the age where at least one of my friends could finally drive. Driving was important to us girls at our parties, because innevitably (at midnight) we would decide that our party was ill-prepared, and we needed to make some Puppy Chow, aka Muddy Buddies. Off we would go to the 24-hour grocery store where each of us would buy an ingredient, and then we would rush home and put together the chocolate-peanut-buttery deliciousness and munch away while talking about boys, independance, and what life had in store for us.

These days we have less sleep-overs, but still crave the sweet and crunchy treat from our childhood. When I saw this new version of Puppy Chow, I knew I had to make my own adaptation to share with my now grown-up friends during a weekend stay at Catherine‘s new home. Chocolate, almond-butter, and coconut all coating a crunchy cereal- sounds like the best way to enjoy a sweet snack inspired by a favorite candy bar of mine- the Almond Joy. (And now I have the old commercial jingle stuck in my head!)

Almond-joy-puppy-chow-ingredients Almond-joy-puppy-chow-mixings Almond-joy-puppy-chow-coconut

I N G R E D I E N T S :

  • 9 C Corn Chex
  • 2 C Almonds
  • 2 C Semi-Sweet Chocolate Chips
  • 3/4 C almond Butter
  • 1 t Vanilla Extract
  • 2 C Powdered Sugar
  • 2 C Shredded Sweetened Coconut

M E T H O D :

Set aside 1/4 C of shredded coconut, and in a food processor (or coffee grinder), mix together the powdered sugar and shredded coconut until is becomes a fine powder. Then, add the reserved shredded coconut, mixing with your hands to ensure there are no clumps.

In a microwave-safe bowl, heat the almond butter and chocolate chips for 1 minute on high. Stir until completely melted and add your vanilla extract to the creamy mixture. In a large bowl (preferably one that has an optional lid), pour the warm mixture overtop of the Corn Chex and almonds. Gently fold together- impatience here causing the cereal to break, so take your time! Now add the powdered sugar and coconut mixture, again gently folding in, just to make sure the powdered sugar is not stuck all in one place- don’t try to completely coat the cereal just yet!

Now is where your bowl’s lid comes in handy*. Place the lid securely over the bowl, and shake the cereal like a samba dancer. When you remove the lid, make sure the cereal is evenly coated. If you need to add more powdered sugar, go ahead and add it now. Once your cereal is coated desirably, pop the bowl in the freezer or refrigerator and chill until ready to serve.

*If you do not have a large bowl with a lid, the cereal and powdered sugar mixtures can be divided and placed into large freezer bags, shaken, and chilled in the bags until ready to serve.

Almond-joy-puppy-chow-2

 Older