Lucy’s Madeline Costume

Madeline Halloween Costume

Lucy’s costume this year has been a dream come true for me! I had thought about dressing up as Madeline myself a few years ago, but never had the gumption to put together an outfit in time for Halloween. But this year, I was so delighted when I asked Lucy, “What about being Madeline for Halloween this year?” and she replied with an excited, “That would be so fun!” I had caught her at the perfect time, in the middle of an old Madeline TV episode we were watching through our Amazon fire stick. She has been intrigued by Madeline and the girls at the old house in Paris, particularly when Madeline has to go to the hospital to get her appendix removed. What can I say, my girl loves hospital drama. I’m sure she’ll love Grey’s Anatomy one day as much as she loves Madeline now.

Madeline book

Lucy decided she wanted to wear a wig to have red hair like Madeline, and I found a dress pattern online with a Peter Pan collar just like Madeline’s. Trick-or-treating is this weekend, and I have until then to make an insulated capelet to keep her warm on a chilly fall evening as we walk from door to door. But I couldn’t wait to share her outfit with you, sans capelet. Check out where I found everything below!

Madeline Costume Buy Online

O U T F I T   D E T A I L S :

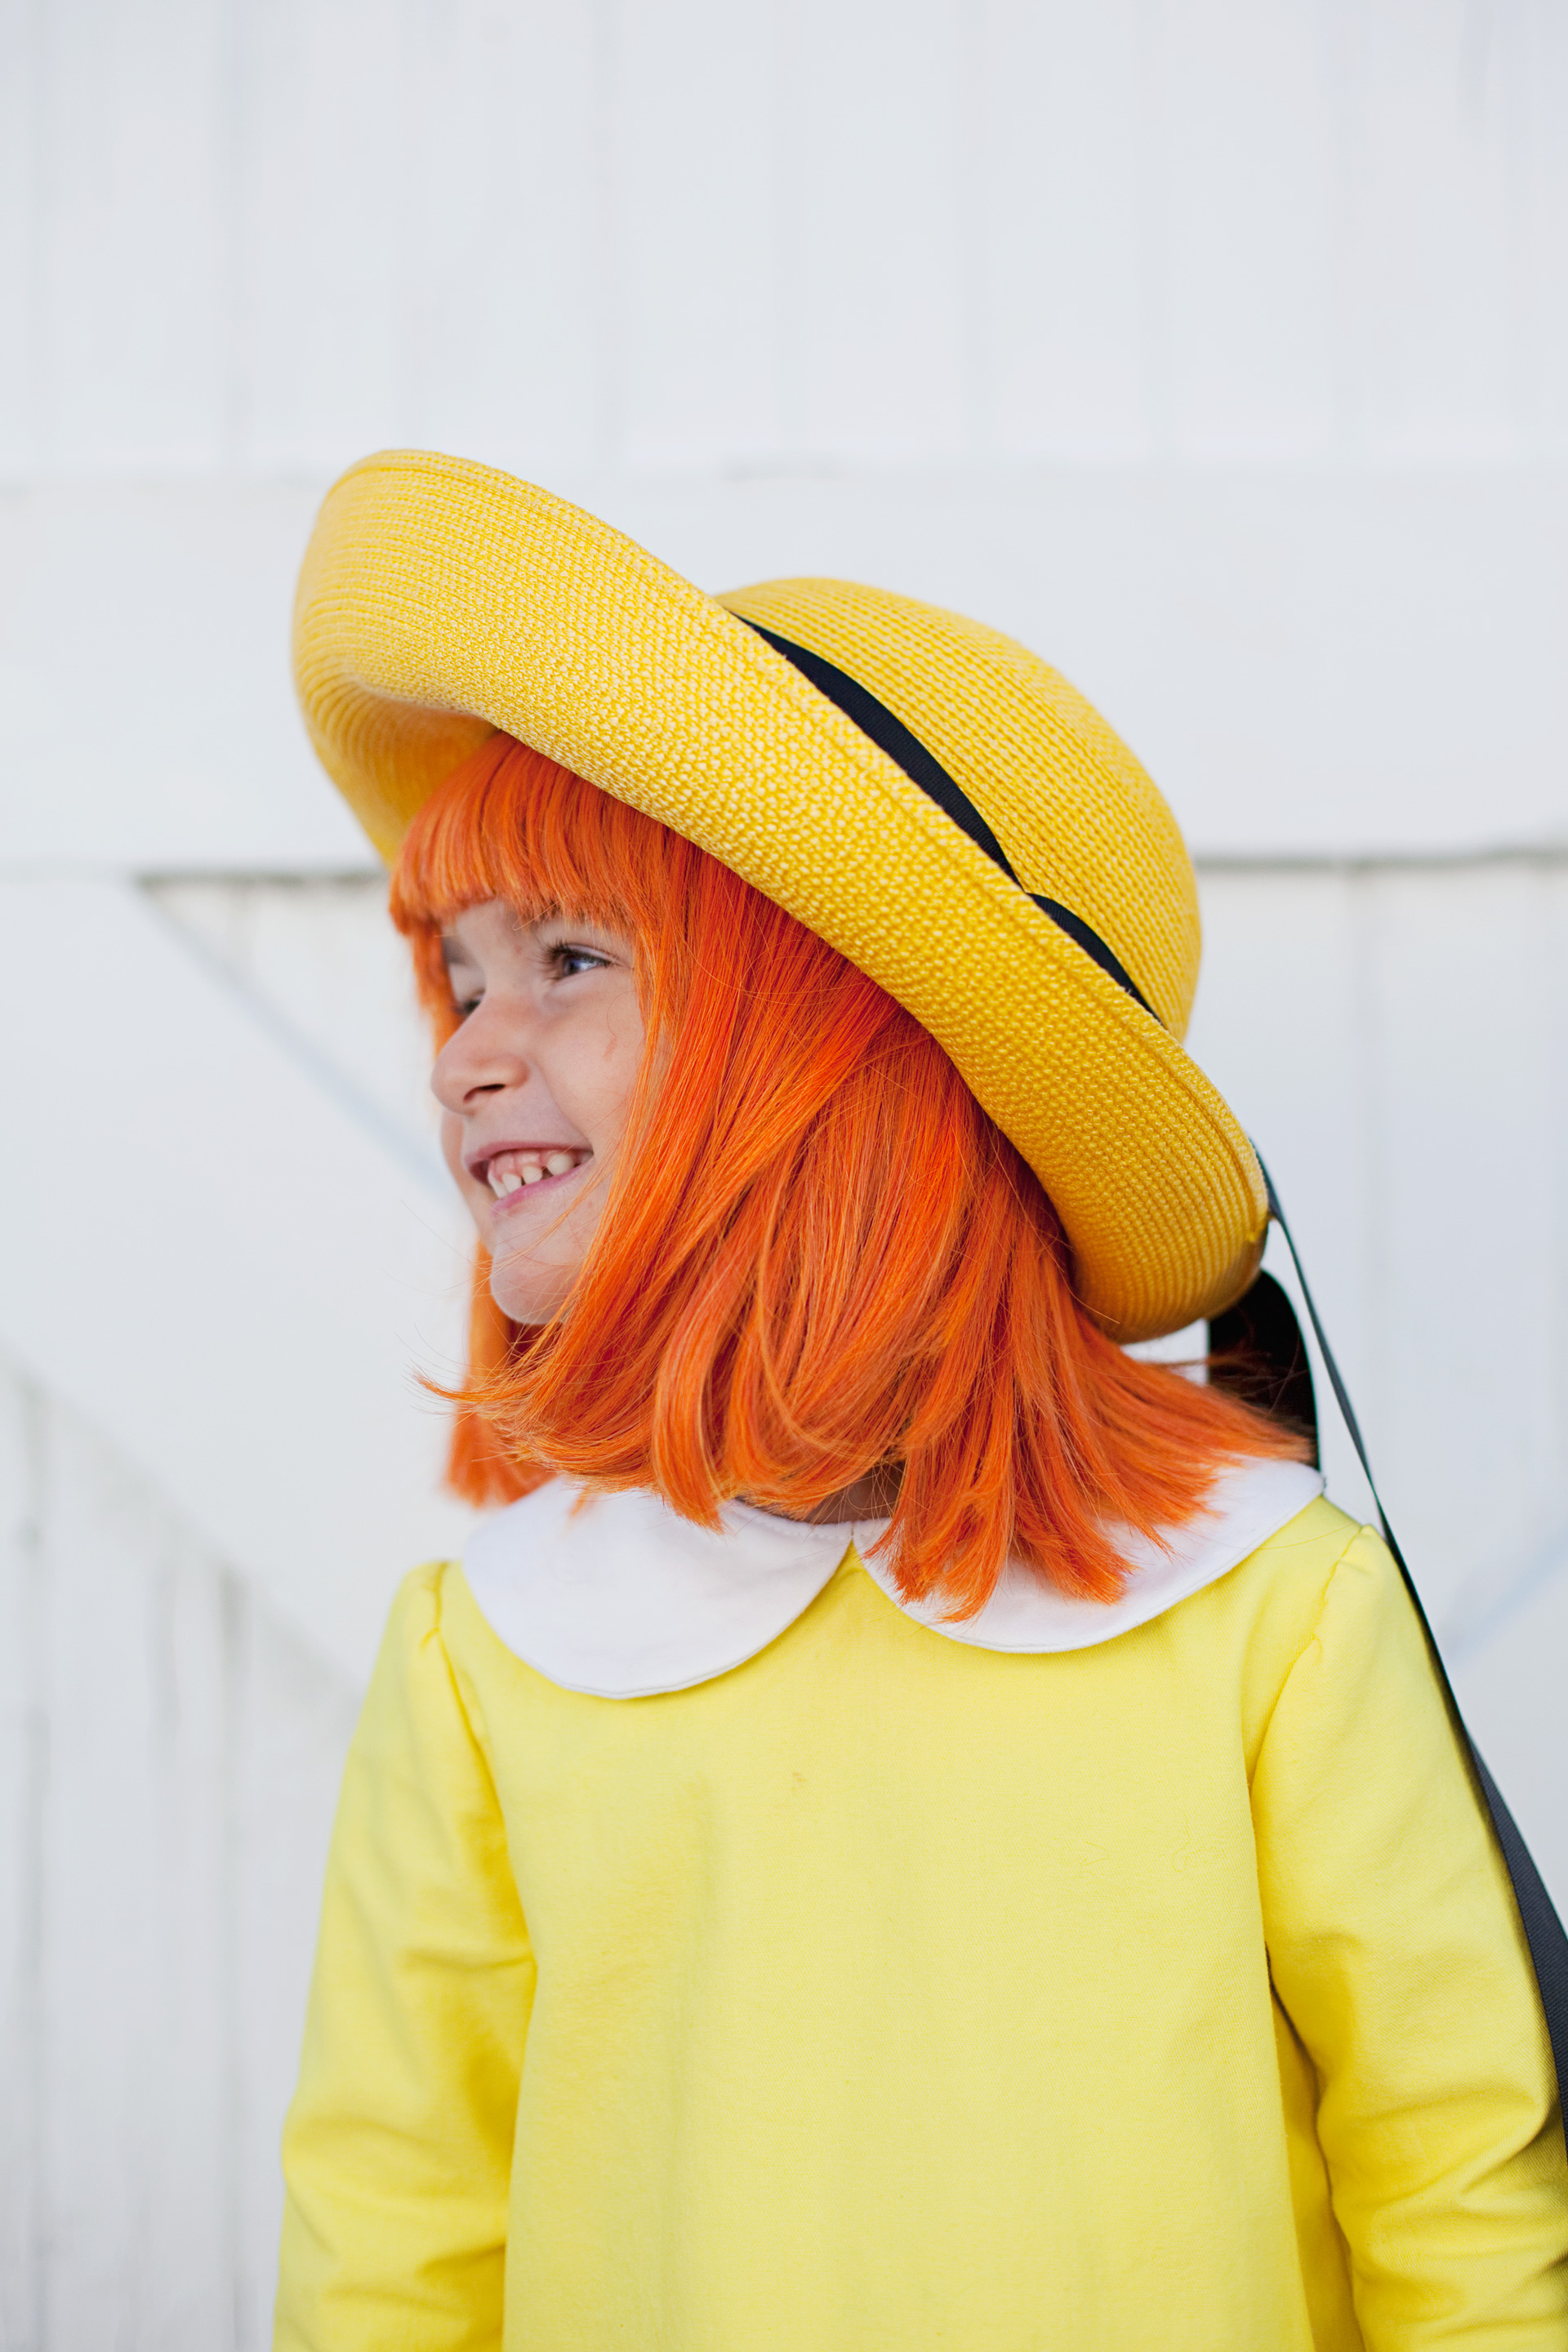
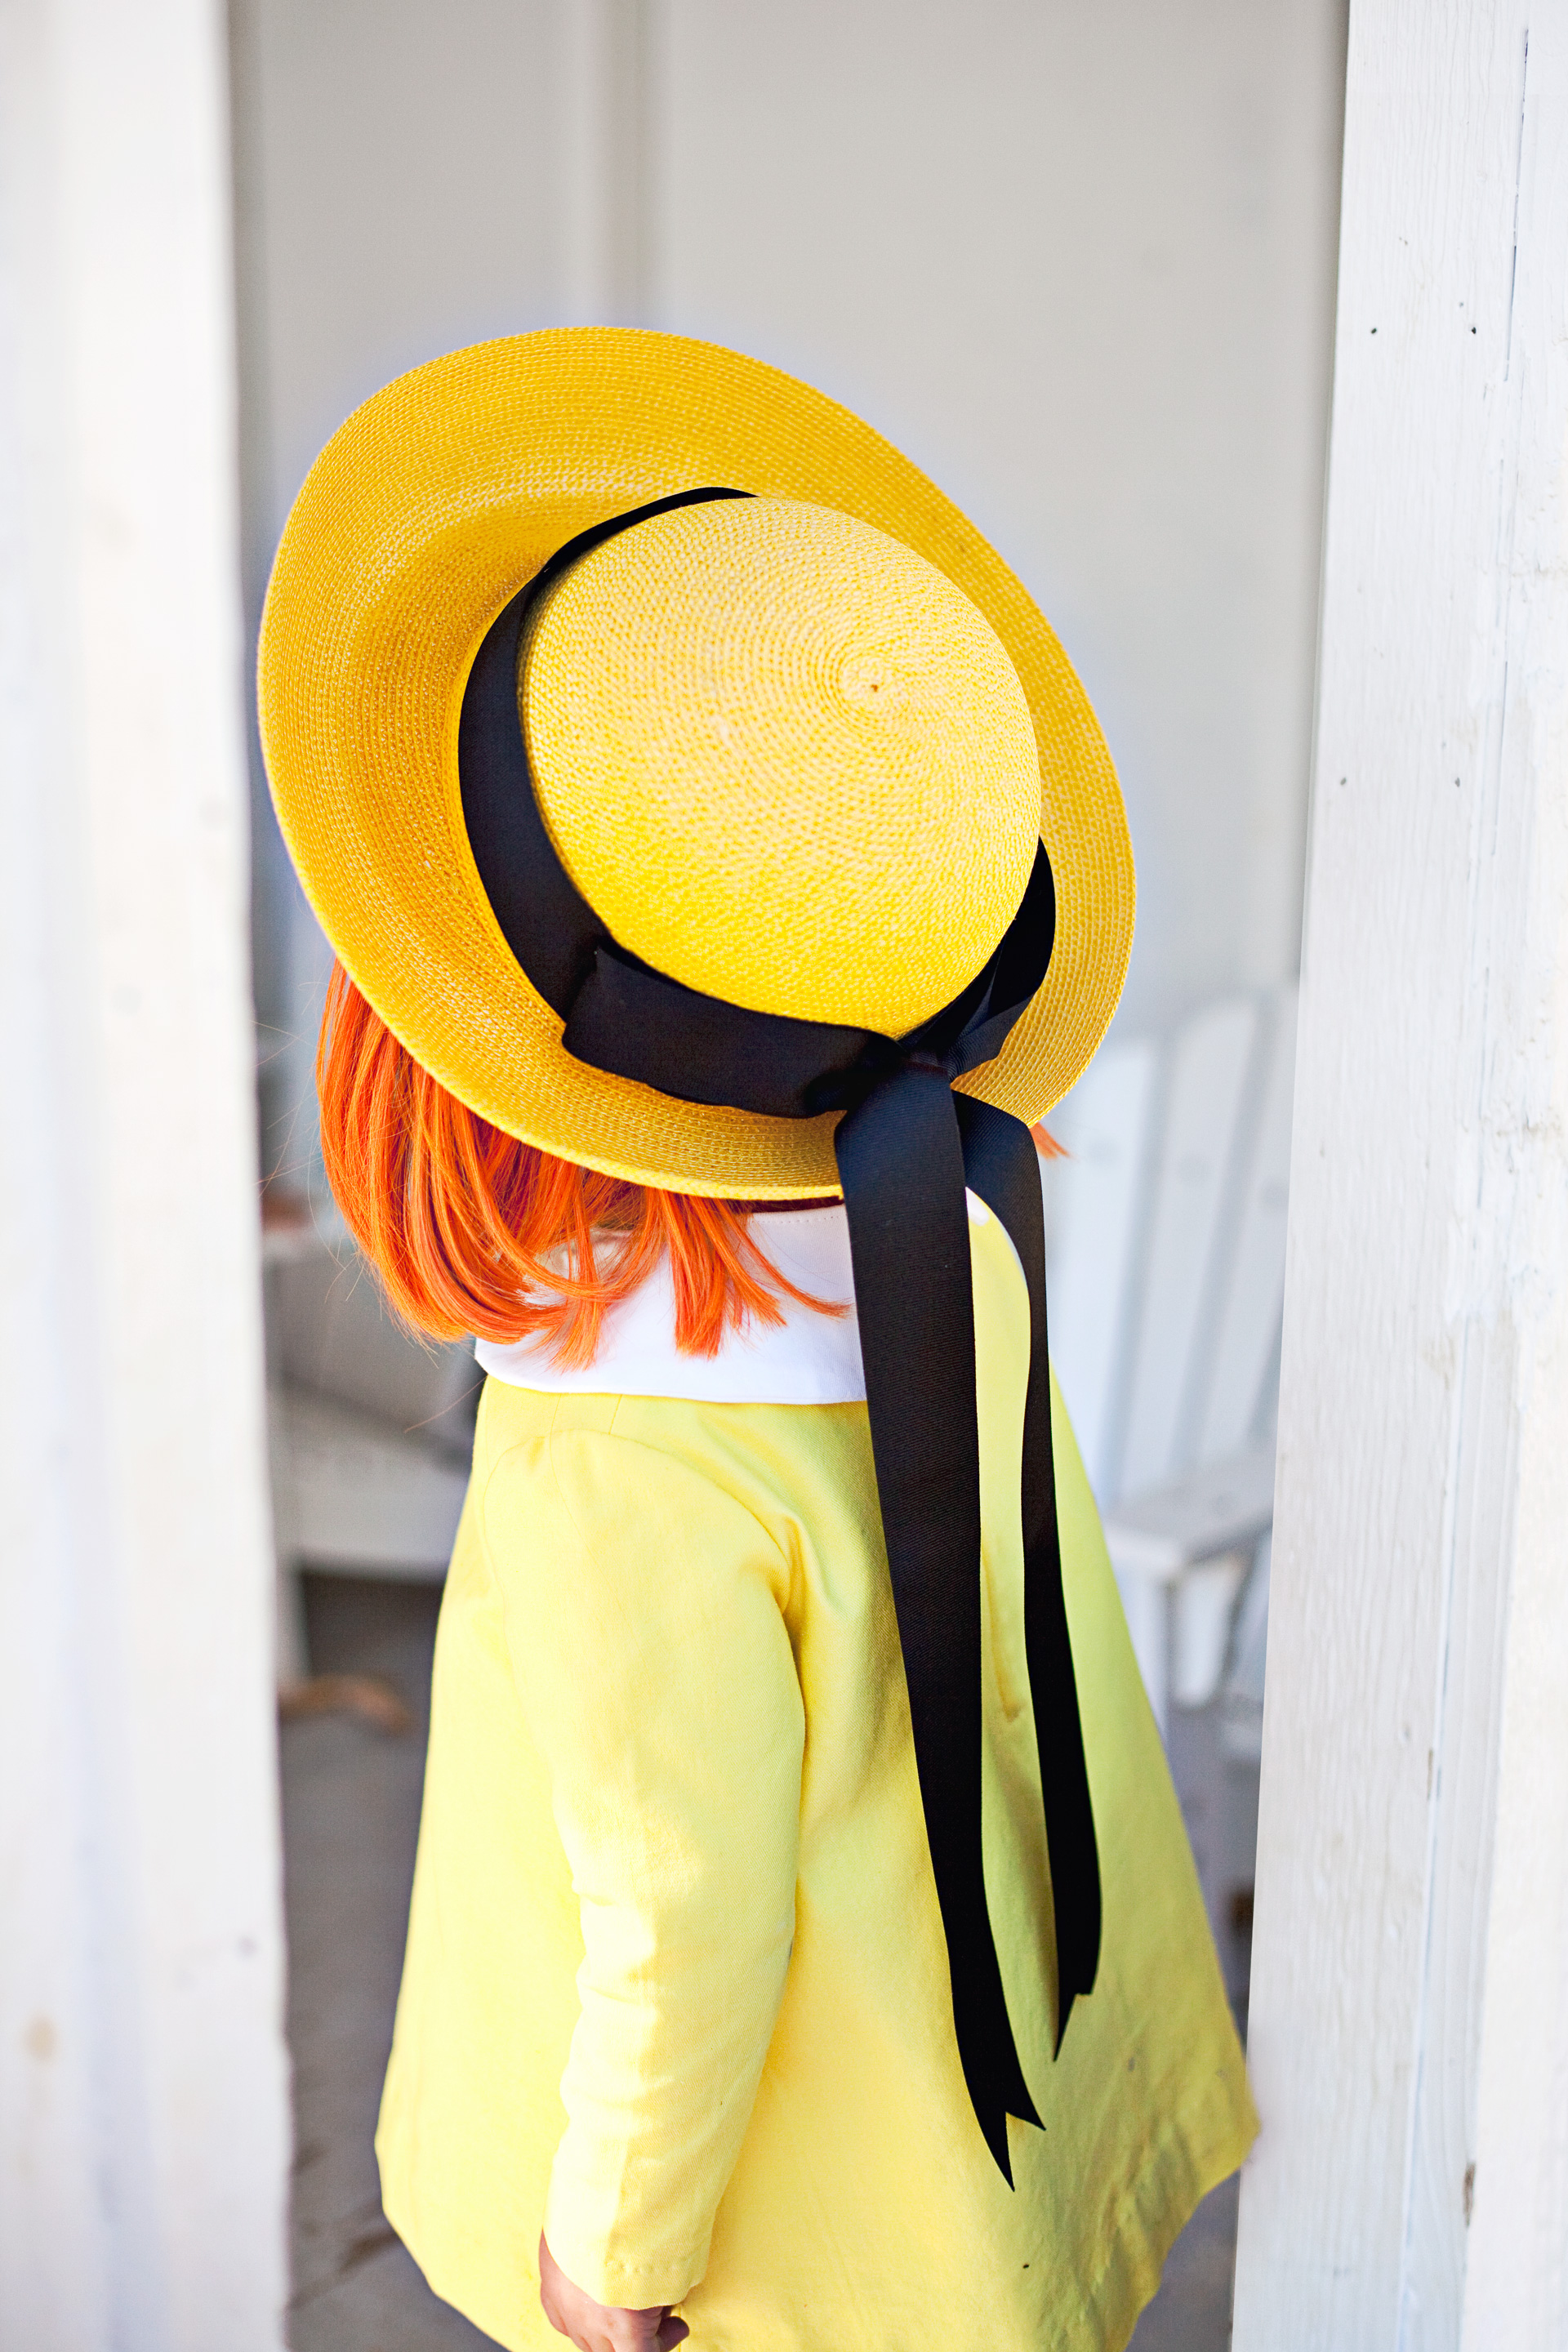
  • H A T :  The one Lucy’s wearing is a vintage find from several years ago that I fixed up with a new black grosgrain ribbon, but I also found a very similar yellow hat here.
  • D R E S S :  I made the dress using this Simplicity Toddler Peter Pan collar dress and coat pattern, slightly reworking to it put the collar on the dress.
  • K N E E   S O C K S :  Lucy wore tights because it was chilly, but we love these white toddler knee socks, and they’re more authentic to Madeline’s outfits in the book.
  • S H O E S :  Any simple black mary janes would fit the bill. We found Lucy’s at a local secondhand store, but here is a great pair of toddler black patent mary janes for less than $20.
  • W I G : I found this orange bob with bangs wig designed for an anime cosplay character, and while it was the perfect color and starting point for a Madeline ‘do, I had to trim the length and bangs and style it with a warm curling iron. Phil stepped up to model the wig while I trimmed it! What a man!

Madeline Dress Pattern

I was so intimidated to make the dress, though I don’t know why, because once I figured out the pattern, it was so quick and easy to put together! I decided I’m going to make a couple more variations on this pattern since the pattern pieces are already cut out, and it was such a simple project resulting in a super cute and versatile dress.

I have a bad habit of being intimidated of sewing projects, putting them off for as long as possible, sometimes abandoning projects altogether. It’s a silly habit I’m trying to break. This was a great simple project that gave me much more confidence as a seamstress. And look at that sweet face! SO WORTH IT.

Madeline Toddler Costume

Madeline Halloween Costume

Madeline hat and wig

Madeline Halloween Costume

Madeline hat and wig
Madeline Toddler Costume

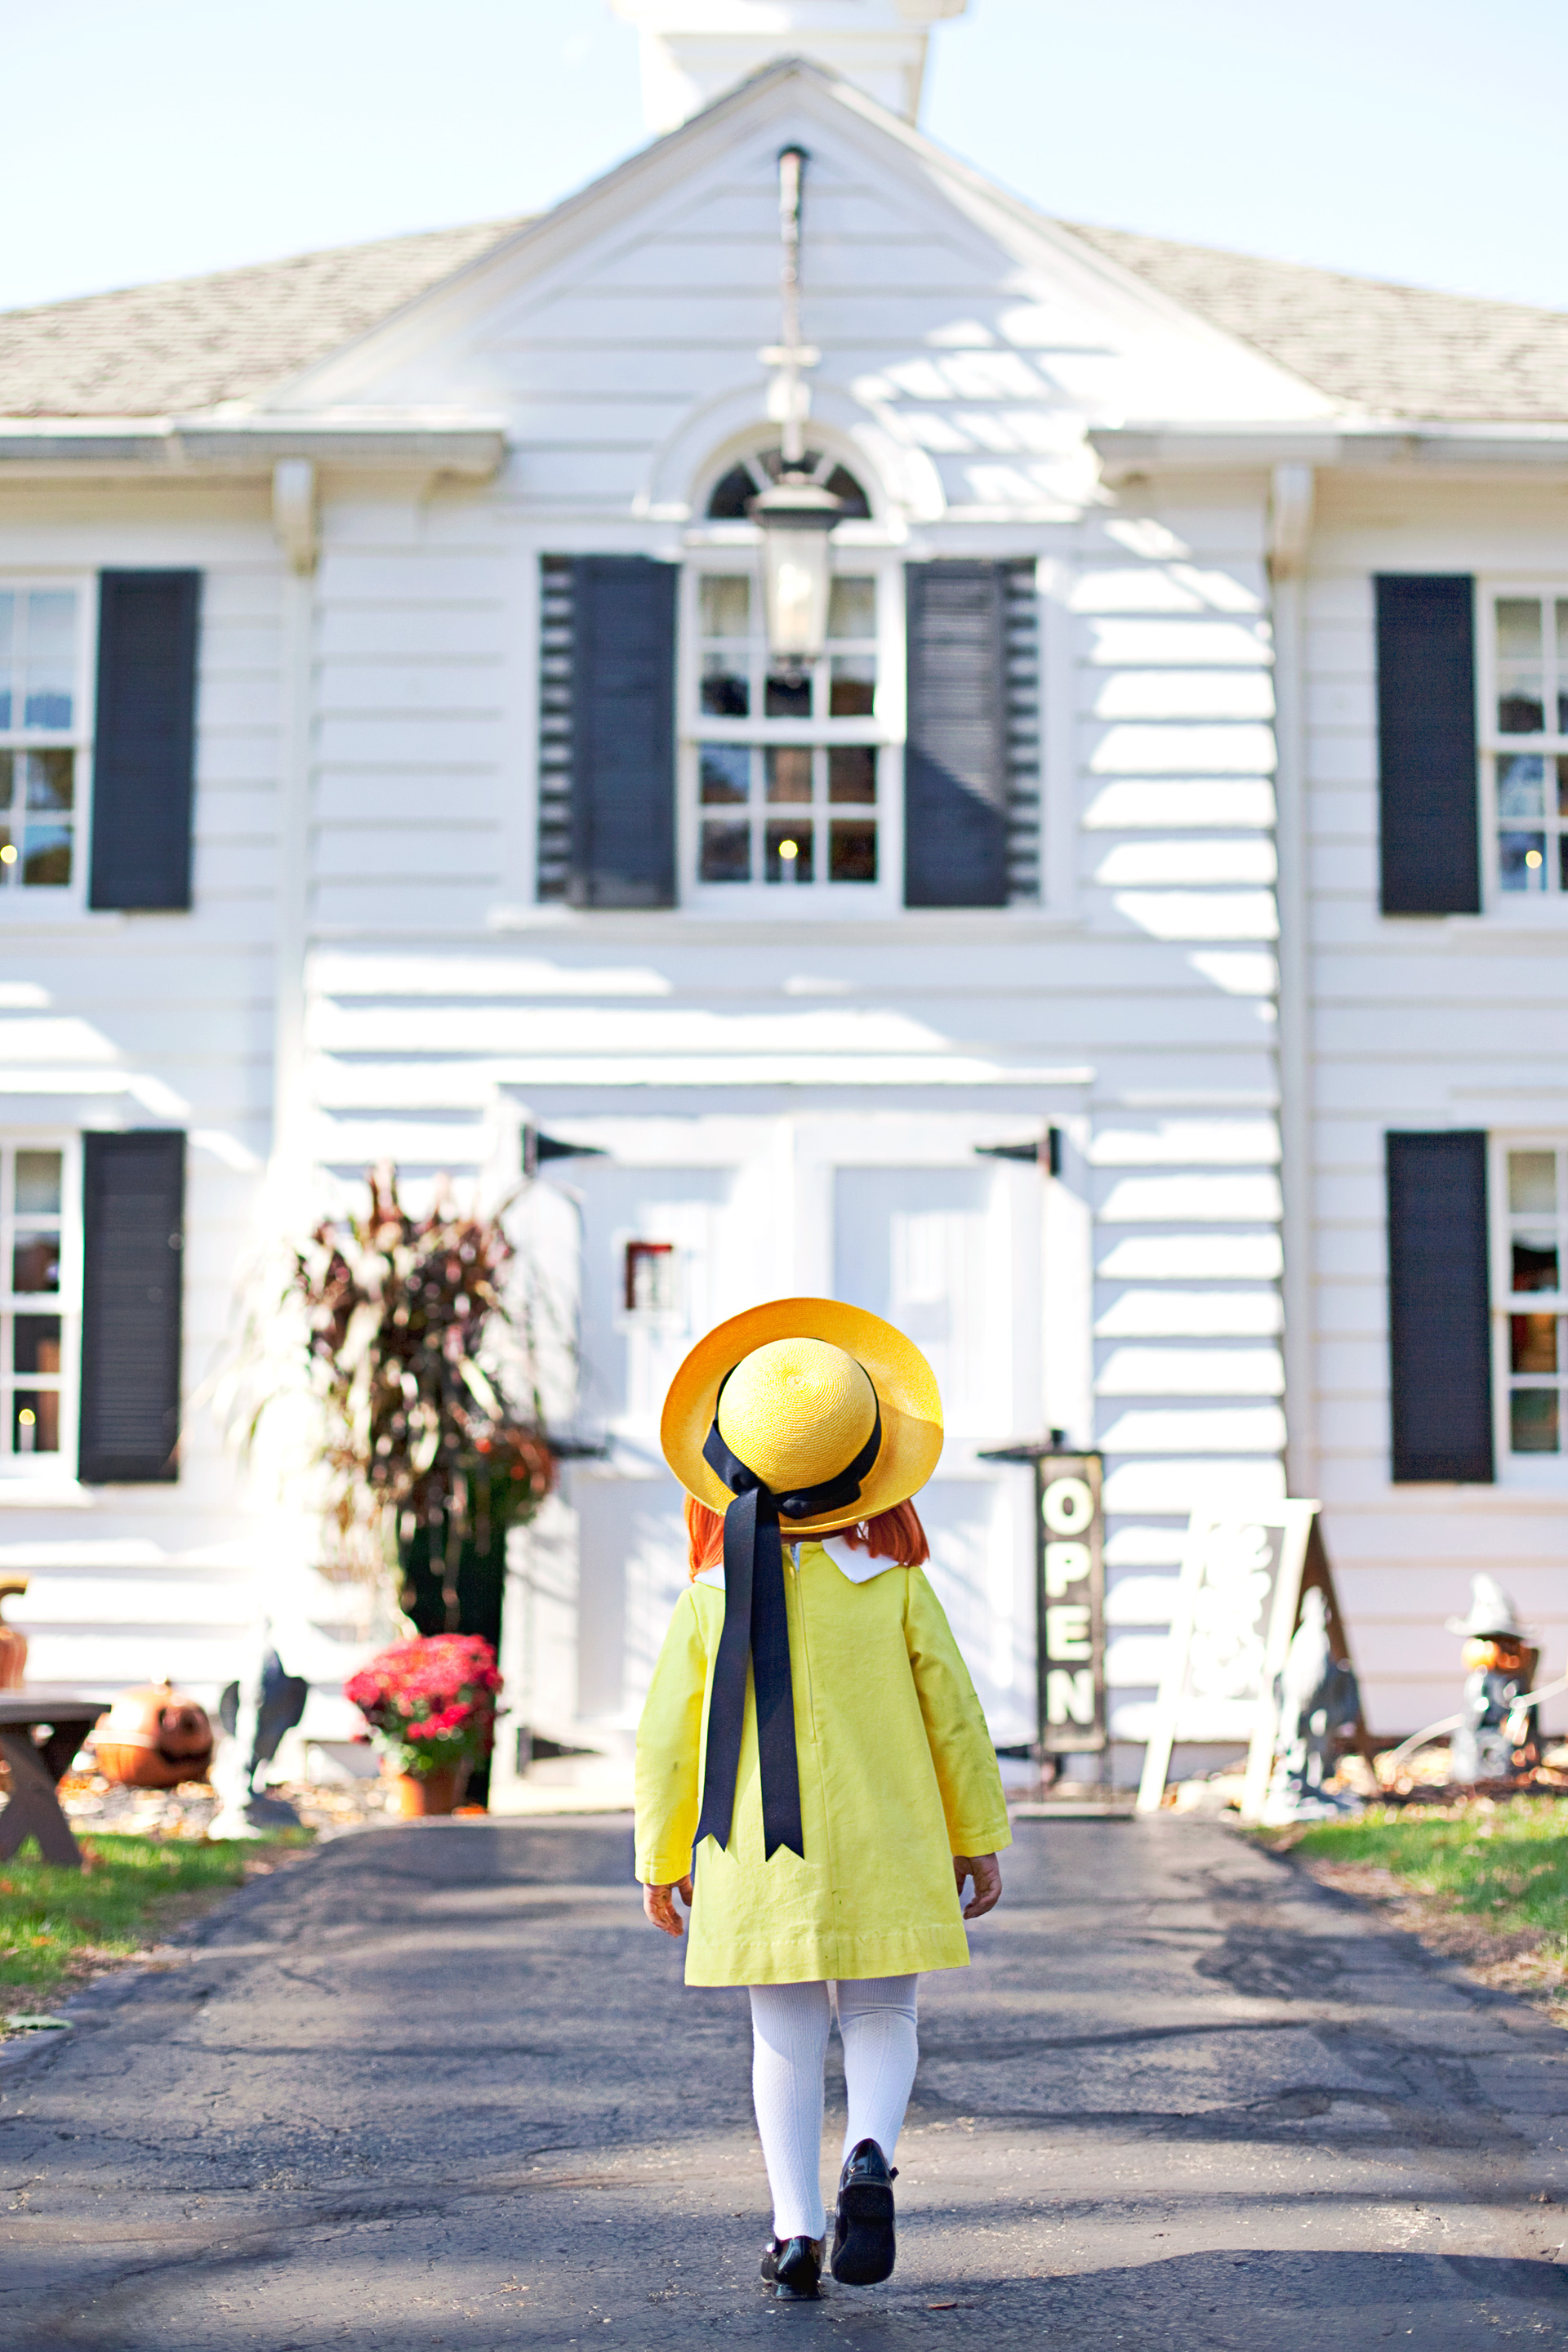
A fun little side note… I took pictures of Lucy as Madeline at the venue where Phil and I had our wedding reception nine years ago! This is a spot we posed for wedding photos. Talk about coming full circle!

In case you were wondering, Juniper is dressing as a puppy (in a store-bought costume) for trick-or-treating, because Lucy’s favorite Madeline TV episode was when Madeline lost her dog. We’re pretty confident we won’t be losing Juniper, though, so don’t worry. The two of them looked so cute together at a friend’s costume party last weekend! We forgot to bring Juniper’s costume when we took Lucy’s pictures, so if you want to see them together, you’ll have to stay tuned for trick-or-treat shots on Instagram next weekend. :)

My First Quilt

Rectangle Block Quilt

Last week at a craft night with friends, someone asked me what my favorite craft medium is. Obviously I love crafting and all things DIY, but I’d honestly never thought about what my favorite medium is! I told her maybe woodworking or sewing. They’re both forms of sculpture for me— I can take something flat and giving it a new shape and new life with a little vision, time, and work. But after saying this, I felt the need to clarify something about the sewing thing.

Not quilts. I love sewing, just not quilts.

Give me a few months, and just like a difficult child birthing experience, I’ll most likely forget my back pain and woes and be ready to give it another go. (Though if quilting is anything like birthing babies, I’ll need a few years between each one!) But as of now, I’m very proud to have finished my first quilt, though I cut a few corners along the way and definitely compromised on my original vision. This was certainly an instance of “Done is better than perfect.”

Rectangle Block Quilt

The top of the quilt is a simple rectangular block construction. At first I wanted to keep things super easy and figured I would just hand tie the quilt, but I really love how quilts get crinkly when machine stitching the layers together. So I watched this very helpful YouTube tutorial and bought myself a free-motion quilting foot for my sewing machine. I designed an elaborate geometric pattern that I had planned to draw on the top of my quilt and then go over with machine stitching. But by the time I had basted together the layers, I had sunk many hours and late nights into the project and thought it might be better than I just finish it up, instead of dragging it out while tediously stitching a complex pattern onto a heavy quilt without the assistance of an extension table on my sewing machine. Not a prospect I relished much, considering the work load I had waiting for A Beautiful Mess projects.

So I decided. Done is better than perfect. I made binding for the quilt and machine stitched it in place, instead of blind stitching it— another compromise. Oh well! I don’t think anyone beside me would have noticed that detail anyway.

Lucy- Making Nice in the Midwest

Rectangle Block Quilt

Lucy- Making Nice in the Midwest

Happily, Lucy loves getting tucked in under her new quilt in her new bed. She gets a little distressed if I don’t cover her with it before leaving the room. And my heart melts. I suppose it’s perfect for her, and I hope that she will always treasure it, knowing that I made it just for her!

It’s fun to do these little projects to make my firstborn feel special, knowing that a new kiddo will soon be sleeping in her old room and old bed, and she’ll most likely have some trouble adjusting.

Have you ever had trouble finishing projects that you end up not enjoying as much as you thought you would? My issue is that I always add more details and tend to make each project more complicated than I have time for. Gotta keep at least one foot on the ground, right?

Lucy- Making Nice in the Midwest 

Sew Your Own Custom Back-Wrap Top

Make your own sewing pattern for a custom wrap top. Step by step photos of sewing process included!

Ready to get your sew on? If you liked the back-wrap top I shared last week, then check it— I’m back with detailed instructions! I hope you won’t be too intimidated to give it a go. If you’re worried about making darts, you can start out with a knit fabric instead of something woven. And you don’t have to make it reversible, but then it would only be half the fun. Point is: You make the rules! If you do make your own, though, just do me one little favor. Link it up, babies!

Make your own sewing pattern for a custom wrap top. Step by step photos of sewing process included!

Make your own sewing pattern for a custom wrap top. Step by step photos of sewing process included!

Step One: Find a shirt that fits closely (but doesn’t stretch) to your figure. Transfer its shape to a piece of kraft paper by poking holes along its border with straight pins. You may also chose to trace the shirt with a fabric pen.

Step Two: Trace the pinhole outline with a pen, cropping the shirt at its natural waist. It’s better to crop it longer than you may eventually want it and you can trim it down later. Add a 1/2″ border to the outline for hem allowance. Then Cut out the piece of paper.

Make your own sewing pattern for a custom wrap top. Step by step photos of sewing process included!

Step Three: Trace the pattern from step two, and indent the outline of the 1/2″ hem allowance. Find the middle of the piece between the armpits.

Step Four: Draw a curved line from the inside, top of the shoulders to the waist, just about 3-4″ from the bottom. Make sure the line you draw intersects the middle point you marked in step three. Cut out the paper along the curve, flip the paper up-side-down and trace it to create the other side of the back.

Make your own sewing pattern for a custom wrap top. Step by step photos of sewing process included!

Step Five: I got a little creative with the neckline by making a ’50s style v-shape. I also created extension pieces for each of the back wrap pieces, each measuring 19″ in length. I decided on their length by having a friend hold ribbon pieces at my waist, tying them comfortably at the front of my waist, and trimming the excess ribbon. Each piece measured 19″ long.

Make your own sewing pattern for a custom wrap top. Step by step photos of sewing process included!

Step Six: Pin the pattern pieces onto your both layers of coordinating fabric and cut out each piece. Make sure as you stack the coordinating fabric that the right sides are facing each other or away from each other. I laid out my pattern pieces on the bias (diagonally) so the fabric would stretch a bit against my curves. I was able to get the back wrap pieces and their extensions all in one piece, instead of cutting out the extensions separately and connecting them.

Make your own sewing pattern for a custom wrap top. Step by step photos of sewing process included!

Step Seven: Begin the process of making bust darts by finding the middle part of the front piece. Then measure out 4″ from the middle point on each side. This is the measurement I used to make my darts after holding the fabric to my body and judging where they should go.

Make your own sewing pattern for a custom wrap top. Step by step photos of sewing process included!

Step Eight: Measure 1.25″ out from the points you just marked in step seven. This will be the width of your darts.

Step Nine: Place a dot in between the two dots from step eight, then measure up 5″. Connect the dots to create the lines for the darts.

Make your own sewing pattern for a custom wrap top. Step by step photos of sewing process included!

Step Ten: Create darts using a similar technique on the sides of the front piece. Again, I measured my darts according to my own body, but if you are similar to me, you may want to measure 5″ down from the armpit hole for the top line of the dart. Then go down 1.25″ for the bottom line of the dart. The point of the dart was positioned 1″ above the point of the bottom darts, as shown in the above image. Connect the top, middle, and bottom lines of the dart to the point.

Make your own sewing pattern for a custom wrap top. Step by step photos of sewing process included!

Step Eleven: Iron the darts so that the crease is right at the middle line of each dart. Then stitch along the outside lines of the darts. Then Iron them flat.

Make your own sewing pattern for a custom wrap top. Step by step photos of sewing process included!

Step Twelve: Begin assembling the top by placing the back wrap pieces face-to-face onto the front piece. Pin along the shoulders and sides and stitch together, 1/2″ from the edge. Then iron the hems flat to prevent bulk when assembling the entire pieces in the next step. You may be able to see that I also sewed darts into the back wrap pieces for an extra fitted design, but it’s really not necessary due to the wrap style.

When you are finished connecting the pieces, make sure it fits you properly. If it doesn’t, you’ll need to make the proper adjustments before continuing.

Make your own sewing pattern for a custom wrap top. Step by step photos of sewing process included!

Step Thirteen: After you’ve completed steps 1-12 with a coordinating fabric (make sure the patterns don’t show through each fabric), fit the pieces together carefully, face-to-face. At this point you are checking to make sure the armpits and shoulders match up. This is why you need to cut both fabrics at the same time and stitch precisely 1/2″ from the edge of the fabric. If they don’t match up at this point, you will need to rip out the hem and correct the fit of one of the pieces.

Pin together the pieces along the neckline, reaching all the way to the ends of the wrap extension pieces. Then stitch 1/2″ from the edge.

Make your own sewing pattern for a custom wrap top. Step by step photos of sewing process included!

Step Fourteen: Cut little slits along the neckline and other curved areas where you have stitched. This will prevent puckering after you flip the piece right-side out.

Make your own sewing pattern for a custom wrap top. Step by step photos of sewing process included!

Step Fifteen: Now pin along the bottom edge of the two pieces and stitch them together everywhere except along the front. This open part is where you will flip the piece right-side-out in the next step.

Make your own sewing pattern for a custom wrap top. Step by step photos of sewing process included!

Step Sixteen: Now you can flip the top right-side-out through that opening you left in the previous step. Use a capped pen to help you with the pointy ends of the wrap extension pieces. Now iron along the hems to flatten it out. Flip under the open section of the front and iron along with the rest of the bottom hem.

Make your own sewing pattern for a custom wrap top. Step by step photos of sewing process included!

Step Seventeen: Pin along the opening of the front, where you just ironed, and then stitch it closed, very closely to the edge of both layers of fabric.

Make your own sewing pattern for a custom wrap top. Step by step photos of sewing process included!

Step Eighteen: Cut little slits long the armholes to prevent puckering after finishing them.

Make your own sewing pattern for a custom wrap top. Step by step photos of sewing process included!

Step Nineteen: Fold under the fabric along the armholes, ironing as you go along. Work one fabric side at a time.

Step Twenty: After each fabric side has been folding under at the armpit holes, each fabric side’s edge matching up, pin the two faces together and then stitch very closely along the edge.

I hope to get a lot of wear out of this top through the Summer— with high waisted shorts, skirt, and even over top of dresses. Yep, it’s a suitor!